
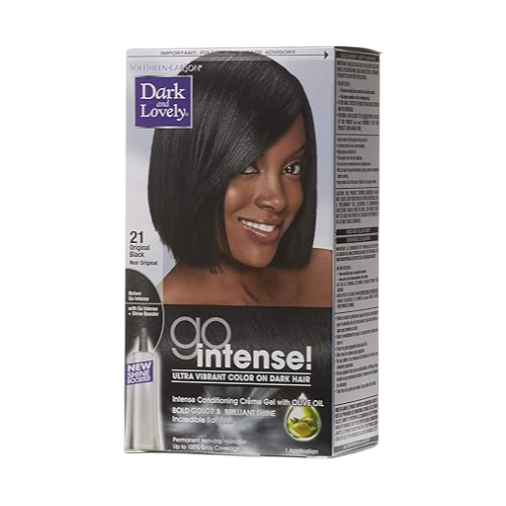
Dark & Lovely Go Intense Original Black Permanent Hair Color Original Black
- Delivers rich, intense black color with exceptional vibrancy
- Nourishes hair for enhanced smoothness, shine, and softness
- Provides up to 100% gray coverage for all hair textures
- Premium cream formula for easy application and consistent results
- Specially formulated to complement diverse hair types
$12.40
Navigating the World of Hair Dye as a Natural Hair Enthusiast
When I first decided to color my natural hair, I stood frozen in the beauty supply aisle, overwhelmed by options. The Dark & Lovely permanent hair color collection called to me with its vibrant boxes and promises of rich color, but I had so many questions. Which shade would complement my skin tone? Would it damage my curls? Was I making a huge mistake?
Fast forward several years, and I’ve become something of a self-taught expert on Dark & Lovely’s permanent color line. Through trial, error, and countless dye jobs (some more successful than others!), I’ve learned that choosing the right permanent hair color is about understanding both the product and your unique hair needs.
This guide reflects my personal journey with Dark & Lovely permanent hair color—the victories, the lessons learned, and everything I wish someone had told me before I started coloring my hair. Whether you’re a first-timer or looking to switch up your current shade, I hope my experiences help you make informed decisions about your hair color journey.
Understanding Dark & Lovely Permanent Hair Color
The Dark & Lovely brand has been a staple in Black hair care since 1972, and for good reason. Their permanent hair color line was specifically formulated with textured hair in mind, addressing concerns that many mainstream hair color brands overlooked for decades.
What makes Dark & Lovely permanent color different from other brands I’ve tried is their commitment to creating formulas that work with our natural hair texture rather than against it. When I first discovered this brand, I was relieved to find color options that didn’t leave my hair feeling like straw afterward.
The permanent color line features an impressive range of shades designed to complement deeper skin tones. From rich browns and vibrant reds to bold blacks and even some fashion colors, the collection offers versatility for anyone looking to transform their look.
Key Ingredients and Formula Benefits
One aspect I’ve come to appreciate is Dark & Lovely’s attention to nourishing ingredients. Their permanent color contains:
- Moisture-Seal Technology that helps retain hydration during the coloring process
- Conditioning oils that provide shine and softness
- Color-lock formula that helps the color last longer without excessive fading
The no-drip cream formula is something I particularly value. My first DIY color job with another brand left streaks down my neck and stains on my bathroom counter that took weeks to fade. With Dark & Lovely’s thicker consistency, application is much more controlled, even for beginners like I once was.
Determining Your Hair Color Goals
Before diving into specific shades, I’ve learned that clarifying your color goals is essential. When I first started coloring my hair, I jumped from trend to trend without considering what would actually work for me. Now I know better!
Are you looking to:
- Cover grays completely?
- Add subtle dimension to your natural color?
- Make a dramatic change with a fashion color?
- Warm up or cool down your current shade?
Your answer will guide which Dark & Lovely permanent color you should select. For instance, when I wanted to cover my emerging gray hairs, I found their Supreme Coverage line most effective. When I was feeling bold and wanted a vibrant red, their Radiant Reds collection gave me the dramatic change I craved.
Understanding your specific hair color goals will save you from potential disappointment and unnecessary damage from color corrections.
Assessing Your Current Hair Condition
Something I learned the hard way: the state of your hair before coloring dramatically affects your results. During my second year of coloring, I tried to dye severely heat-damaged hair and ended up with uneven color that faded quickly in some areas.
Before applying any permanent color, honestly evaluate:
Hair Porosity
Porosity refers to how well your hair absorbs and retains moisture. My hair is highly porous, which means it absorbs color quickly but can also fade faster. If you’re like me, you might want to leave the dye on for a shorter time than instructed and plan for more frequent touch-ups.
To check your porosity, take a strand of clean hair and place it in water. If it sinks quickly, you have high porosity. If it floats, you have low porosity. Medium porosity hair will sink slowly.
Previous Chemical Treatments
When I tried to color my hair after a relaxer without giving it proper time to recover, the results were disastrous. The color took unevenly, and my already compromised hair became even more fragile.
If you’ve had chemical treatments like relaxers, perms, or previous color, give your hair adequate time to recover before applying Dark & Lovely permanent color. I now wait at least 2-3 weeks after other treatments before coloring.
Current Hair Health
Be honest about your hair’s health. Is it breaking? Does it feel dry or brittle? If so, focus on restoring your hair’s health before coloring. After my color disaster, I spent three months deep conditioning weekly and minimizing heat styling before attempting to color again.
The Complete Dark & Lovely Permanent Color Collection
Dark & Lovely’s permanent color collection is extensive, and understanding the different lines helps narrow down your options. Here’s what I’ve discovered about each:
Classic Permanent Color Line
This is their standard line with a wide range of natural-looking colors. I started with shade 372 (Natural Black) when I wanted something close to my natural color but with more richness and shine.
The classic line offers:
- Natural blacks
- Various brown shades from light to dark
- Auburn and reddish-brown options
- Warmer honey tones
Fade Resist Formula
When I complained to a friend about how quickly my color was washing out, she recommended Dark & Lovely’s Fade Resist line. The difference was noticeable! These colors are formulated to maintain vibrancy through multiple washes.
Popular shades in this line include:
- Rich Auburn (376)
- Luminous Blonde (396)
- Chestnut Brown (373)
Supreme Coverage
As I’ve gotten older, covering grays became a priority. The Supreme Coverage line targets resistant gray hair specifically. When I switched to this line for my increasingly stubborn grays, I noticed complete coverage that the standard line couldn’t achieve.
Fashion Colors
For those bold moments when I wanted something beyond natural tones, Dark & Lovely offers some vibrant options. Their Radiant Red collection gave me that fire-engine red I craved during my bold color phase.
Finding Your Perfect Shade Match
Choosing the right shade was my biggest challenge when starting with Dark & Lovely. Here’s my approach after several years of experimentation:
Consider Your Undertones
Understanding your skin’s undertones makes a huge difference in how flattering your hair color will be. When I ignored this advice and chose an ashy brown, it made my warm-toned skin look sallow.
- For warm undertones (golden, yellow, or peachy skin): Choose warm hair colors like golden browns, copper, mahogany, or caramel
- For cool undertones (pink, red, or bluish skin): Opt for cool shades like ash brown, burgundy, or blue-black
- For neutral undertones: You’re lucky! Most colors will complement your skin
The Two-Shade Rule
One valuable tip I’ve learned: staying within two shades of your natural color typically produces the most natural-looking and lowest-maintenance results. When I went four shades lighter than my natural color, the upkeep was exhausting, with noticeable roots appearing within two weeks.
Box Color vs. Reality
Remember that the model on the box and the actual results can differ significantly. I recommend searching online for real people with similar hair texture and starting color who have used the shade you’re considering.
When I was debating between Dark & Lovely’s Chestnut Brown and Vivid Red, seeing actual results on women with hair like mine helped me make my decision (the Chestnut Brown was much more flattering with my complexion).
Popular Dark & Lovely Permanent Shades and Their Effects
After trying numerous shades and talking with friends who use Dark & Lovely, here are some fan favorites and what you can expect:
Natural Black (372)
This was my gateway shade—rich, deep black with subtle blue undertones that give dimension. It covered my early grays well and added incredible shine to my natural color.
Luminous Blonde (396)
My friend with medium brown skin tried this and achieved a beautiful caramel-blonde that brightened her complexion. Be warned: going blonde requires more maintenance and typically needs more processing time.
Spicy Red (394)
During my red phase, this gave me a vibrant, head-turning color that somehow still looked sophisticated. It faded to a pretty auburn after about 4-6 weeks.
Rich Auburn (376)
This subtle red-brown gave me dimension without looking unnatural. It caught the light beautifully and complemented my yellow undertones perfectly.
Honey Blonde (378)
Another friend with dark brown skin found this shade gave her hair a beautiful sun-kissed glow that looked natural and enhanced her complexion.
Preparation: Setting Yourself Up For Success
After several mishaps (including staining my favorite shirt and running out of dye halfway through my head), I’ve developed a pre-color routine that ensures better results:
Supplies You’ll Need
Beyond what comes in the box, I recommend having:
- Old button-down shirt or cape
- Petroleum jelly to apply around your hairline
- Extra gloves (the ones provided sometimes tear)
- Timer
- Old towels
- Clips to section hair
- Plastic shower cap
Strand Test: The Step I Used to Skip
I cannot emphasize enough how important this is! After skipping this step and ending up with a color far darker than expected, I now always conduct a strand test 48 hours before coloring:
- Mix a small amount of color and developer
- Apply to a small section of hair, preferably underneath where it won’t be noticeable
- Leave on for the recommended time
- Rinse and check the color once dry
This gives you a preview of the results and helps you adjust processing time if needed.
Scalp Preparation
I’ve found that not washing my hair for 2-3 days before coloring helps protect my scalp from irritation. The natural oils act as a buffer. However, if you have product buildup, use a clarifying shampoo 3-4 days before coloring to ensure even color absorption.
The Application Process
The application process can make or break your color results. Here’s my step-by-step approach after many trial-and-error sessions:
Sectioning Technique
My first few dye jobs were patchy because I didn’t section properly. Now I divide my hair into four sections (down the middle, then ear to ear) and clip each section. I work through one section at a time, starting with the back sections where hair is typically more resistant.
Application Method for Different Hair Types
For my 4C texture, I’ve found that applying color with the bottle, then working it through with gloved hands gives the most even coverage. Friends with looser textures sometimes prefer using just the applicator bottle for more precise application.
If you’re covering grays, focus on those areas first, as they typically need more processing time. I leave the color on my resistant gray areas for about 10 minutes before applying to the rest of my hair.
Common Application Mistakes
These are errors I’ve made that you can avoid:
- Using too little product (my thick hair needs 1.5-2 boxes for complete coverage)
- Rushing the application (take your time for even color)
- Not paying attention to the hairline and nape (easily missed areas)
- Inconsistent processing times (use a timer!)
Processing Time Adjustments
The instructions say to leave the color on for 25-30 minutes, but I’ve found that processing time should be customized based on your specific hair needs and desired results.
Factors Affecting Processing Time
- Previous color treatments: My previously colored hair processes faster
- Gray coverage: My resistant grays need the full time or slightly longer
- Hair porosity: My highly porous ends process faster than my roots
- Desired intensity: When I want more vibrant results, I leave it on the full time
My Processing Time Guidelines
- For gray coverage: Full 30 minutes, sometimes up to 35 for stubborn areas
- For virgin hair: 25 minutes is usually sufficient
- For previously colored hair: 20-25 minutes to avoid over-processing
- For refreshing faded color: 15-20 minutes focused mainly on the roots
The Right Way to Rinse
Proper rinsing makes a huge difference in color longevity and hair health. My technique has evolved over time:
- Rinse with lukewarm water (not hot!) until the water runs clear
- Apply the conditioner included in the box and let it sit for 2-3 minutes
- Rinse thoroughly
- Follow with a color-safe deep conditioner (I leave this on for 15-20 minutes under a shower cap)
The first time I colored my hair, I skipped the deep conditioning step and regretted it immediately. My hair felt dry and brittle until I deep conditioned a few days later.
Post-Color Care: Maintaining Your New Shade
How you care for your hair after coloring determines how long the color lasts and how healthy your hair remains. Here’s my post-color regimen:
The First 72 Hours
What you do immediately after coloring is crucial. The cuticle layer remains open for up to 72 hours after coloring, making your hair more vulnerable but also more receptive to conditioning treatments.
During this time, I:
- Avoid washing my hair
- Apply a protein-moisture balancing treatment
- Minimize heat styling
- Avoid chlorinated water or salt water
- Sleep with a satin pillowcase to reduce friction
Weekly Maintenance
My weekly routine for colored hair includes:
- Washing only 1-2 times per week with sulfate-free, color-safe shampoo
- Deep conditioning with each wash
- Using a color-depositing conditioner once every two weeks to refresh my shade
- Applying a leave-in conditioner with UV protection to prevent sun fading
Monthly Treatments
Once a month, I do:
- A protein treatment if my hair feels limp or overly soft
- A clarifying treatment followed immediately by intense moisture if I notice buildup
- A hot oil treatment to maintain shine and softness
Touch-Up Strategies
Root touch-ups require a different approach than full-head coloring. Here’s what I’ve learned:
When to Touch Up
I typically see noticeable roots around 4-6 weeks, depending on how fast my hair grows and how different my natural color is from the dyed shade. For gray coverage, I usually need to touch up every 4 weeks.
Root-Only Application
For touch-ups, I focus only on the new growth:
- Section hair the same way as a full application
- Apply color only to the roots, staying about 1/4 inch away from the previously colored hair
- Process for 20-25 minutes
- In the last 5 minutes, I dilute some color with conditioner and pull it through to the ends for the last 2-3 minutes to refresh the overall color without over-processing
Preventing Color Overlap
A mistake I made early on was overlapping new color on already-colored hair during touch-ups. This created bands of darker color and eventually led to breakage. Now I use these techniques:
- Apply petroleum jelly to the line where new growth meets colored hair to prevent the color from bleeding
- Use a color brush for more precise application at the roots
- Dilute the formula for the last few minutes when pulling through to the ends
Troubleshooting Common Issues
Even with experience, things don’t always go as planned. Here are some issues I’ve encountered and how I’ve resolved them:
Color Too Dark
After ending up with nearly-black hair when I wanted medium brown, I discovered these solutions:
- Color-removing shampoo used 1-2 times can gently fade too-dark color
- A mixture of clarifying shampoo and baking soda can slightly lighten overly dark results
- Vitamin C treatments (crushed tablets mixed with shampoo) can fade color by 1-2 levels
Uneven Color
When I ended up with patchy color, these fixes helped:
- Deep conditioning to even out porosity before reapplying
- More careful sectioning during application
- Using a color gloss to blend uneven areas
Excessive Dryness After Coloring
My hair felt like straw after my first few colorings until I implemented:
- Pre-color treatments with coconut oil the night before coloring
- Extended deep conditioning sessions after coloring
- Reducing heat styling for at least two weeks post-color
- Weekly oil treatments focused on the ends
Premature Fading
When my vibrant red faded to copper within weeks, I learned to:
- Wash with cold water only
- Use color-depositing products between colorings
- Protect hair from sun exposure with hats or UV-protective products
- Avoid clarifying or chelating shampoos
Special Considerations for Different Hair Types
Different hair textures interact uniquely with Dark & Lovely permanent color:
For 4C Texture (My Hair Type)
With my tightly coiled 4C texture, I’ve found:
- The color often appears darker than on the box due to how light reflects off tight coils
- More product is needed to ensure complete saturation
- Processing time may need to be adjusted (sometimes shorter) due to higher porosity
- Extra moisture treatments are essential before and after coloring
For 3C-4B Textures
Friends with these textures report:
- More predictable color results closer to the box image
- Better color distribution with the bottle applicator
- Standard processing times generally work well
- Moisture balance is still important but less likely to experience extreme dryness
For Looser Curl Patterns
Those with looser curls have shared:
- Colors sometimes appear brighter than expected
- Less product is typically needed
- More noticeable roots as new growth appears
- More frequent touch-ups might be necessary
The Reality of Permanent Color Commitment
When I first chose permanent color over semi-permanent, I didn’t fully understand what I was committing to. Here’s what I wish I’d known:
Growth and Maintenance Reality
With permanent color, you have essentially two choices as your hair grows:
- Touch up the roots regularly
- Grow it out (which means months of a visible line of demarcation)
When I decided to transition from red back to my natural color, I had to accept a year-long journey of awkward two-tone hair or choose to cut it short.
Long-Term Effects on Hair Health
After five years of coloring, I’ve noticed:
- My hair porosity has increased
- My curl pattern has loosened slightly in some areas
- I need more protein in my routine to maintain strength
- More attention to moisture-protein balance is necessary
Financial Commitment
The cost adds up over time:
- Color kits every 4-6 weeks
- Specialized color-care products
- Deep conditioners and treatments
- Potential salon visits for corrections if things go wrong
Alternatives to Consider
Before committing to Dark & Lovely permanent color, consider these alternatives that I sometimes wish I’d explored more fully:
Semi-Permanent Options
Dark & Lovely offers semi-permanent colors that:
- Gradually fade over 4-8 washes
- Don’t require developer
- Cause less damage to hair
- Allow for easier color changes
Temporary Color Products
For those wanting even less commitment:
- Color-depositing conditioners
- Temporary spray colors
- Hair makeup products
- Color wax products designed for textured hair
These allow you to experiment without the long-term commitment of permanent color.
My Personal Dark & Lovely Color Journey
I started my coloring journey seven years ago with Dark & Lovely Natural Black, simply wanting to enhance my natural color and cover a few grays. Over time, I’ve experimented with:
- Rich Auburn (376) when I wanted warmth without going fully red
- Spicy Red (394) during my bold color phase
- Chestnut Brown (373) when I wanted something more subtle
- Supreme Coverage in Natural Black when my grays became more resistant
Each change taught me something about the products and my hair’s reactions. My favorite remains the Rich Auburn, which gave my complexion a warmth that I loved while still looking professional for work.
Final Thoughts: Is Dark & Lovely Permanent Color Right for You?
After years of using Dark & Lovely permanent color, here’s my honest assessment:
Dark & Lovely permanent color can be an excellent choice if you’re committed to maintaining colored hair, want complete gray coverage, and are willing to learn proper application and care techniques.
It works especially well for those who:
- Want long-lasting, vibrant color
- Need reliable gray coverage
- Are looking for shades formulated for deeper skin tones
- Have textured hair that other brands don’t adequately address
However, it might not be ideal if you:
- Change your mind frequently about your hair color
- Have significantly damaged hair
- Aren’t prepared for regular maintenance
- Prefer subtle, temporary changes
The most important lesson I’ve learned is that successful hair coloring is as much about the aftercare as it is about the initial application. With proper care, Dark & Lovely permanent color can give beautiful, vibrant results that enhance your natural beauty while keeping your hair healthy.
Whether you’re covering grays, adding dimension, or making a bold change, I hope my experiences help you navigate your own hair color journey with confidence. Remember that every head of hair is unique, and what works for one person may need adjustment for another. Be patient with yourself, and don’t be afraid to seek professional help if you encounter challenges beyond your comfort level.